What elevates a good device lab to greatness? Usability. As developers, designers, and product managers, we think about our product’s users all day. We develop user stories, we do user research, we iterate until we can develop the best user experience possible. When it comes to your device lab, think of your fellow coworkers as your end users. What can you do to make your lab as intuitive as possible for this audience?
Focusing on improving the UX of your lab has a number of teriffic side effects: it eases your teammates’ work, it makes the lab more inviting, and it makes your job easier in the long run.
That last side effect is an important one. In our first year of iterating on the device lab at Etsy, we encountered a number of surprises when we’d check in on our setup. We found devices with changed passcodes, networks, and wallpapers. We found devices with broken screens, missing batteries, and stolen cables. We discovered that people had connected personal email addresses and social media accounts, had accidentally upgraded operating systems, and so much more. Focusing on the ease of use of your lab will help more than your users; it’ll help save you from a ton of headaches, too. We promise: usability should be your top priority as you finish building your device lab.
Hardware
Your devices aren’t the only pieces of hardware in your lab. There are lots of opportunities for you to improve the usability of your lab between the wall and your devices. From cables to stands to screen wipes, organize the lab to ensure it’s easy for people to pick out and return devices.
Cable management
The number one rule of thumb when it comes to cable management in your lab: make it easy to plug devices back in. It sounds simple,
but we found that this tip massively increased the rate at which people returned devices properly to the lab. We had spent months trying to figure out why people just weren’t returning devices to their proper place. Why leave cables dangling just a quarter inch above a device? Why not just ensure things are charging correctly? The fact is: people are lazy, and it’s something you’ll need to account for as you build the lab. When we started organizing cables better and making them easier to use, this went a long way to helping people do the right thing.
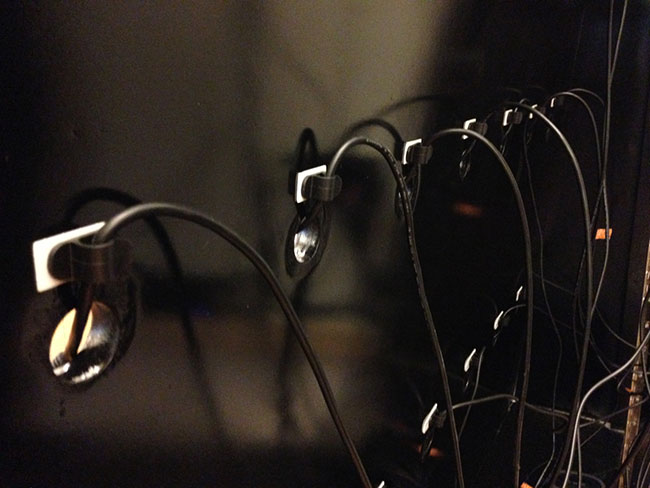
To start, make sure that there are enough cables for devices, and that the cables are always at-the-ready and plugged into a charging station. If a device’s cable isn’t dangling exactly where a person expects it, that person is very unlikely to completely plug the device back in. It’s understandable; people are in a hurry, and they want to be able to drop their device and go. In an early version of our lab, we learned that if a cable had fallen behind the lab’s shelving, or if it wasn’t clear which cable went to which device, our lab’s users would just return devices by laying them down on a shelf without plugging them back in.
To combat this complication of battery drain and disorganization, we instituted new hooks and cable drops to make sure that cables stayed in place. Cable drops are small clamps that can be adhered to your lab to hug your cable in place. They helped us ensure that the end of a charging cable remained close to each device stand, making it much easier to plug devices back in when they’re returned. Hooks on the back of shelves can also help keep cables organized and untangled.
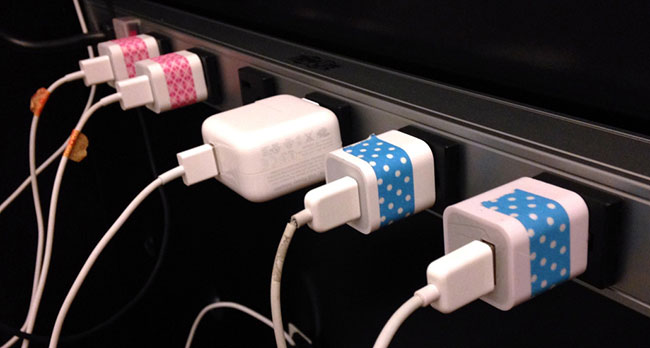
In your lab, there will likely be devices with proprietary power cables, devices that overdraw, and devices that you might want to group together. Employ colorful washi tape or other kinds of labels on power bricks and cables to help keep things organized.
Group similar devices in your power chain. When we grouped iOS devices along the same power supply and noted which cables went to iPhones and iPods and which went to iPads, we found it much easier to troubleshoot bogus cables and reorganize when necessary.
An added benefit of tying back cables and marking them is that they’ll be much harder for your coworkers to borrow; fewer cables will go missing from your lab when your teammates need to recharge their personal phone. We found that by keeping our power strips and cables behind closed doors (rather than out in the open on shelves), we mitigated a lot of the cable attrition in the lab. Since it naturally occurs to people to check the lab when they forgot their personal charging cable at home, we chose to keep the lab stocked with a basket specifically for USB cables for them to borrow. If you go this route, plan on replenishing a basket like this every quarter or so.
Device stands
The second rule of thumb is: make it easy to return devices.
When people return devices to your lab, they’ll have a choice about how nicely they place devices back. Your choice of device stands contributes to how successfully devices are returned, and you’ve got many options for good stand solutions.
You could purchase a number of individual stands for your devices in a range of sizes. We bought stands for all of our devices off of Etsy for an early version of the lab, and found that the style of device stands really has an effect on how organized or cluttered your lab looks.
Stands are rarely one-size- ts-all. Focus on purchasing easel-style stands which allow the device to lean on the stand to stay upright, especially if you have older devices (which tend to be thicker). If you have newer, thinner devices, try some stands that have a slot in the base for keeping devices upright. Remember to test any stands with larger devices to ensure they won’t tip over in portrait and landscape modes.
The trick with using individual stands is that they’ll get bumped around a lot and can look disorganized if they’re not adhered to the shelf. You’ll find that some people will leave devices on top of stands rather than standing upright in them, perhaps out of hurriedness or laziness. Perhaps they just didn’t know which stand to use and made a quick (and poor) decision. Test a number of stands to see what works best for your lab and its user base, and be sure to label things well. It should be as easy as possible to return devices properly in your lab; your lab’s users shouldn’t have to think too hard about where to put a device back, where its cable is, or how to place it in a stand.
In a later version of our device lab, we replaced the bookshelves and individual stands with shelving that has built-in stands. The newer lab’s shelving sits at a slight angle, allowing devices to lean against the lab itself in a one inch-wide felt-lined gap. The gap is wide enough to accommodate a range of device sizes, and also allows us to move devices around and across shelves as we replace devices over time. This solution ended up looking cleaner for our needs, as we no longer had to deal with individual stands that unfortunately got bumped around often.
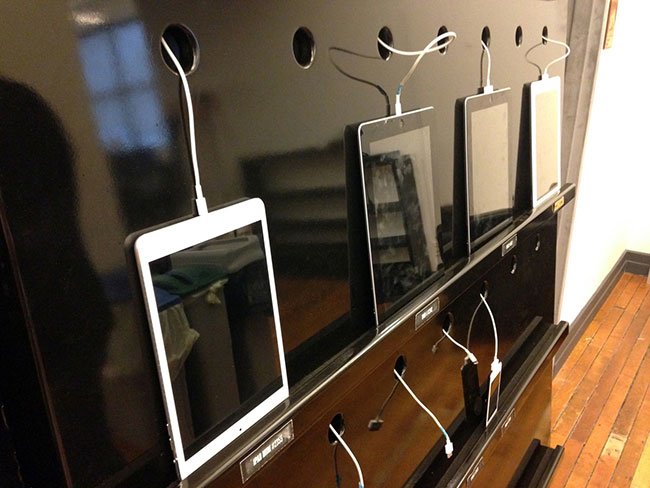
With this new kind of lab furniture, we also introduced holes wide enough for a range of device cables to fit through (including older 30-pin iOS cables). We found that this combination of cable management and shelving made it easier for people to return devices properly, and led to fewer headaches for us as we maintained the lab.
Things to steal
It’s a device lab fact: people will steal (uh, long-term borrow) things from the lab. Earlier we mentioned providing extra cables for folks to grab; we also provide baskets for USB wall chargers and screen wipes, as people naturally come to the lab thinking we might have spares.
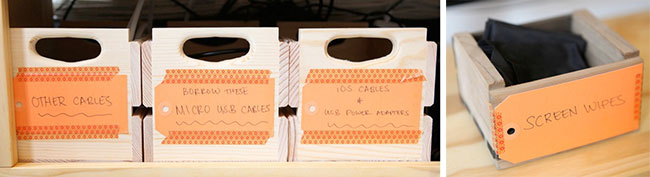
What goes in these buckets depends on your lab and your coworkers’ needs. We found that people began to check the lab for things like international power adapters, micro SIM cutters, and other random things – so we started to supply them! The happier the device lab can make people, the more they’ll want to use it. We want it to be as intuitive, friendly, and welcoming as possible, so that our coworkers will be able to develop the best mobile user experience possible for our site’s users.
Device Organization
It can be handy to develop an organizational system for where they each sit if you have more than a handful of devices in your lab. This will help your lab’s users easily find the devices they’re looking for, and return them properly later.
Group your devices
There are many ways to organize your devices. The key here is to be consistent across shelves, such as grouping by:
- device size (handsets, small tablets, large tablets, etc.)
- operating system (Android, iOS, Windows, etc.)
- put the unique devices on the top shelf (Google Glass, Firefox OS, Windows phone)
Grouping devices of like size together can help people who are testing responsive designs and who need to borrow an array of screen sizes. Grouping by operating system can also help people who are troubleshooting bugs on a particular platform, especially if you label devices by their operating system version.
Be sure to build in space so that you can add to the device lab over time. It should be easy to move devices around, decommission devices, and re-group devices if necessary. Again, build for ease of maintenance in the long-term!
Label everything
Good labeling makes it easy to pick out a device for testing and to match a device to its home base. You can go a little nuts with labeling (we sure did) but it’s easy to start with the information that’ll be the most helpful to your users. For our coworkers, the most helpful information was each device’s name, operating system version, and ID number, labeled in a place that’s easy to refer back to.
Maybe you want to name each of your devices; I know of one lab that named devices after United States presidents’ dogs so it was easy to refer to each individually in conversation. At Etsy, we used the common device name like ‘Samsung Galaxy S3’ and included our asset number for the device (#1449) to help differentiate duplicate device models. We labeled the front of the shelf and the back of the device with the same exact wording so that it was really easy to match a device to its stand upon return. This also meant it was easy to connect the device name to what we were seeing in our analytics’ visitor data.
Picking out devices can be harder for your device lab’s users than returning them. To troubleshoot this, ask yourself why your users are coming to use the lab. Are they on the support team, trying to reproduce a bug on a particular operating system version? Are they a designer who is beginning to figure out what a product should look like on smaller tablets? Are they a developer, implementing a responsive design for an HTML email? Depending upon these use cases, you may want to provide information nearby for each of your devices, such as:
- screen resolution
- pixel density
- operating system version
- primary email application
In earlier versions of our lab, we used library cards to list this information and placed them underneath each device. We included a cup of pencils so that people checking out devices could note what date they grabbed them. But the error rate here was high; people often forgot to sign their name, or thought they’d be right back and would forgo the sign-out process. It became clear that while our labeling solution was okay, our sign-out process needed improvement.
Our next iteration, which solved a whole host of problems in addition to tracking devices, was to move to an online library of information about our lab devices. We created a database of devices and stored this same information on an internal site so that people could see at a glance what devices were available and which best suited their testing needs. We included the same kind of information that we’d had on the library cards – operating system version, screen size, pixel density, and more – but added status of whether the device was signed in or out, and by whom. Below is a screenshot of the device lab’s home page, and each individual device name links to additional information about it:
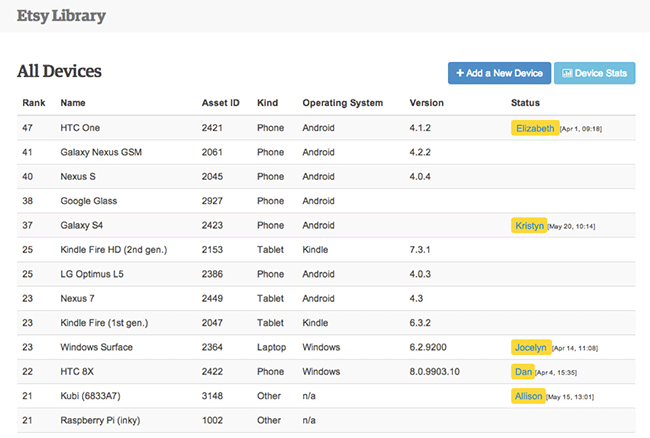
So how did we figure out who had checked out a device last? By implementing an electronic checkout system that integrated with our employee key cards, it’s been easier for people to remember to check in and out devices, and easier for us to gather data about device lab usage.
For this electronic checkout system, Etsy’s Office Hackers made a custom Radio-Frequency Identification (RFID) system. They programmed a Raspberry Pi to work with the reader that was plugged into our network via ethernet. Each device got its own RFID tag so that it could be uniquely identified.
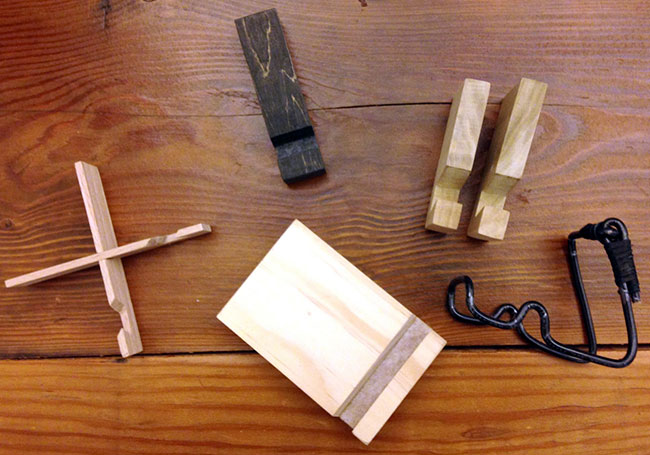
When an employee wants to check something in or out, all they need to do is tap the device, then tap their employee badge, on the RFID reader! This data is sent over our network, where internal users can access this dashboard, which shows when a device was last checked out and by whom. You can read more about this setup in the office hackers’ Code as Craft blog post, and check out their open sourced checkout system code. In our case, the Raspberry Pi lives in a stump hand crafted by an Etsy seller, which adds a new level of friendliness and uniqueness to the lab, making people want to bump the stump with their employee badges to see the system light up.
Whether you use library cards or something more high-tech to keep track of devices, the ease of checking devices in and out of the lab is crucial for its overall usability (and your stress levels).
Document a how-to
It’s true that people rarely read information until they absolutely need it. When it comes to the device lab, we started gathering the most typical questions we get when people go to use it for the first time without reading up about it first. It’s become hugely beneficial to have a central wiki page that includes:
- passcodes (which are the same for every device to improve ease of use)
- instructions for testing on development and staging environments
- instructions for taking screenshots and checking email on various operating systems
As mentioned in Chapter 3 – Device Setup and Configuration, we also set up email applications across devices so that our marketing team can test newsletter designs. We use a common email address across all devices so that the team can send once and test everywhere. Install a default email client and any other major email applications that your audience uses on your devices to make it even easier to test at a glance.
Put reminders everywhere
To stave off headaches, you’ll likely need to constantly remind people to not upgrade applications or operating systems, as well as remind folks to check out their devices. By ‘constantly’, we mean on the walls near the lab, as wallpaper on the devices, and on all documentation.
It’s true that reminders aren’t going to work every time. It’s also true that positive reminders work much better than angry reminders – aim to use the carrot, not the stick! We like to kindly remind folks to not upgrade things, and we place that reminder right next to an invitation to reach out to us, with clear contact information, if someone has a question or something in the lab seems not- quite-right. The more inviting you can be, the more likely it is that someone will come forward truthfully when something breaks or gets lost. This is time saved in detecting something’s awry, and will also save you many headaches in the long run.
Software
It should be really easy for your coworkers to use the devices in your lab, and equally easy to not mess anything up on a device. In addition to the initial configuration tips listed in Device Setup, we recommend some additional steps to save you and your lab’s users time and energy.
Keep passwords a secret
The device unlock passcodes should all be the same and well-known to your coworkers. But don’t tell anybody who’s not a device lab administrator:
- app store passwords, as you don’t want surprise app downloads on your devices.
- email passwords, as you don’t want anybody to change the email testing setup across your devices.
- Wi-Fi network password, if you’re using a private network specifically for the device lab, as you don’t want to compromise the security of the lab.
Make it easy to test
Mobile device testing shouldn’t just happen for work that’s made it to production. Your lab will come in handy when designers and developers want to test what they’re currently working on to see how it performs across various screen sizes and operating systems.
If your coworker tries to visit their virtual machine from a device in your lab, it should render as expected, like it does on their laptop. This means ensuring that necessary security certificates are installed and that the Wi-Fi network that the lab uses allows access to testing and staging environments.
If you use a tool like Adobe Edge Inspect to test across many devices at once from one primary browser, you’ll probably need to manually connect to each of those devices one by one. This can get really annoying if you’re visiting the lab for the first time to use Adobe Edge Inspect and need to connect your laptop’s browser to each individual device running the app by typing in each device’s pin.
To circumvent this, you can include a cheaper laptop in your lab that can be checked out for testing too. Connect this laptop to all of those devices once, and let people know that they can use this laptop for Adobe Edge Inspect rather than their personal one to avoid the hassle of setup! If you go this route, choose a laptop type that isn’t typically used by the people in your organization so that it’s an additional option for routine desktop testing needs.
Manage with a MDM
In Chapter 3 - Device Setup and Configuration, we covered what to look for in a good mobile device management solution (MDM). If you go this route, use your MDM to routinely check on the operating system versions of your devices and the apps installed. If necessary, reset devices from your MDM to clean them up; it’s inevitable that someone has accidentally installed or upgraded something on a device. Keeping the installed applications to a short list will be helpful in keeping the lab manageable, and consistency across devices reduces surprises in the testing process.
Check the lab regularly
In addition to routinely checking in with your mobile device management solution to ensure that things haven’t been upgraded or installed on your devices, visit your lab routinely to check out how it’s faring. On the next page is a checklist to run through with each device; we find that although a visual spot-check is helpful for devices, you should also unlock and check each individual device to find and fix additional surprises. Appendix C: Routine Checkups covers this as well as quarterly checkups on your lab.
- Is the device missing from the shelving but not checked out in your system? When was the last time it was checked out correctly? Does the last person to check it out still have it?
- Are there any new scratches, bumps, or broken glass on the device?
- Is the device plugged in? Is it actually charging? Sometimes devices will be plugged in but have a faulty cable, leading to the false appearance of charging correctly.
- Does the passcode still work? (Surprisingly, people have changed the passcodes in our lab’s devices, for unknown reasons.)
- Is the device connected to the right Wi-Fi network?
- Is this device’s operating system version still accurate?
- Have any new applications been installed?
- Has anyone connected their personal accounts (Facebook, Twitter, etc.) to the installed apps?
- Do the mail applications still use the correct device lab email address?
Doing a routine check (at least once per week) will help you find and troubleshoot issues quickly. It’s unfortunate, but people are often reluctant to report issues in the lab right away, as they don’t want to be blamed for someone else’s mistake or misuse of the lab. Checking the lab routinely will also make it easier for you to track down missing devices; the longer the disappearance, the less likely it is that you’ll find it again.
Keep it inviting
A good-looking lab is inviting. New hires see it on their tour of the office, and guests want to check it out and see how it works. Existing coworkers don’t want to work next to clutter. And the more organized the lab is, the more likely your coworkers will want to use it and put stuff back properly!
Keep it clean and organized. Make sure that labels are intuitive and helpful. Tie back and hide cabling, space out devices, and wipe down their screens once in a while. Keep the screens facing out towards your lab’s users. Keep your signage helpful and simple.
Collaboration
Make it really easy to collaborate near your lab! People often want to test their work on devices and get feedback as they tweak. We’ve also seen plenty of people share learnings with others sitting near them as they test; we found that the lab has been integral to our adoption of a mobile-first development approach as people talked with each other as they developed near the lab.
To aid this kind of collaboration, set up comfortable seating nearby. A couch, comfy chairs, or other grouped seating is helpful. Nearby long tables can be handy, too, so people can set up their laptops and don’t have to walk far to make changes to their code as they test.
Make sure additional outlets are available for people to plug in their own laptops; you don’t want people to unplug devices so that they can work nearby. Ensure that people don’t have to walk back to their desks to test their work. The easier it is to set up and collaborate near the lab, the better!
These usability tips will help you empower your teammates to do their best work. By testing your site and apps on real physical devices, designers and developers can get a significantly better understanding of the real user experience you are crafting. By collaborating, learning from each other, and continuing to improve on the lab over time, you and your teammates will be equipped with the tools you need to stay ahead of the ever-changing mobile landscape.
Chapter Summary
Usability tips
- Make it easy to plug devices back in.
- Make it easy to return devices to their rightful place in a stand or on a shelf.
- Supply spare USB cables as well as screen wipes, USB wall chargers, and anything else people may want to long-term borrow.
- Group your devices consistently across shelves, in a way that’s intuitive for your device lab’s users.
- Label your devices and provide helpful information about them nearby.
- Make it easy to check in/check out devices.
- Document a how-to that’s easy to share with others about your device lab, and put reminders about best practices everywhere around the lab.
- Make it easy to test in-development work on the devices.
- Routinely check in on the lab to suss out any issues and remedy them.
- Keep the lab inviting and make it easy for people to collaborate nearby.
Budget tips
- Budget for spare USB cables and anything else people may want to long-term borrow.
- If possible, budget for comfortable seating near the lab.
- You may also want to budget for an electronic check-out system for ease of maintenance.