After you purchase devices and begin setting up your lab, the next trickiest (albeit fun) bit is creating a power solution for your lab. It’s just plugging in some cables and power strips… easy, right? Unfortunately, in our experience, troubleshooting power issues (not the political kind!) was the largest time sink we had while growing Etsy’s device lab. By planning early and streamlining your power chain, you’ll be able to save yourself quite a few headaches (and a bit of your budget!).
In this section, we’ll cover typical power issues, how to suss them out and fix them, and how to keep your lab energy efficient. We hope to save you a lot of time troubleshooting!
Choosing your hardware setup
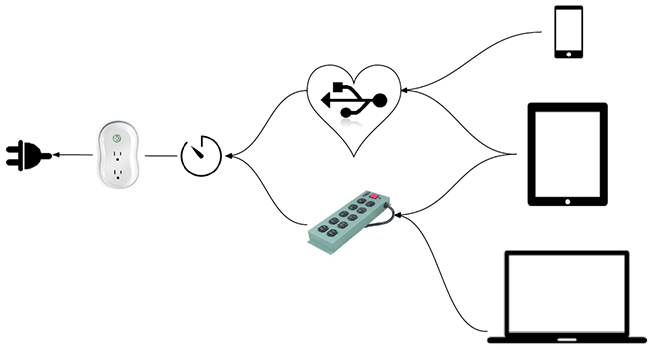
It may be helpful to see an example of one complete device lab power chain. Here’s what Etsy’s device lab power chain looks like, from the wall to the devices. In our lab, the devices are plugged in to either a power strip or into a USB hub. The power strips and USB hubs both get plugged into a single timed power supply so that we are able to turn the lab’s power off at night. This single timed power supply gets plugged into a Modlet (a tool that measures energy consumption), and the Modlet is plugged into the wall outlet.
It took us quite a few iterations to get to this solution as we optimized for energy efficiency, usability and organization of cabling, and the capacity of different power supplies and USB hubs. We’ll delve into the problems we ran into and how we resolved them, but first, we’re going to brush up on Electricity 101. Having some basic knowledge will help you understand how to avoid problems in your device lab later on. Feel free to skip this section if you’re versed on the basic principles of electricity.
Electricity 101
The most common units of power you’ll come across when planning for your device lab are amps, volts, and watts. Understanding how to measure electricity is important in figuring out how much power is needed to support each individual device properly, and also in figuring out how many devices a particular hub or surge protector can support. Doing this math early will save you many headaches later as you assemble the entire device lab and need to coordinate multiple devices’ power needs.
You’re probably wondering how amps, volts, and watts relate to each other. They’re defined simply here, but we’ll expand with more context through a few examples below.
- amps (A) – amount of electricity
- milliamps (mA) – 1/1000th of an amp
- volts (V) – force of the current
- watts (W) – the amount of work that can be done over a period of time
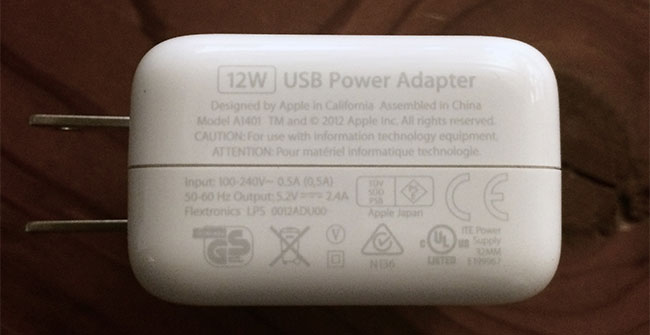
In the example on the next page, we can read the specifications for a power adapter. Most adapters have this information clearly marked. This particular adapter has an output voltage of 5.2 volts, and a current of 2.4 amps. If you multiply the volts with the amps, you get a measure of watts. So, this adapter outputs 12 watts.
Additionally, you could power the same device with an adapter that was 2 volts with 6 amps, because it would still output 12 watts. Math!
USB hubs
What makes this a bit trickier is when we introduce USB hubs into our power equation. The current for USB ranges from 100mA to a maximum of 500mA per port. A typical seven-port hub might have a 1A power supply, but that doesn’t mean it would have enough power to fully drive a 500mA load on each of the seven ports. For example, this hub could power two iPads, but if you added a third iPad, it may not receive any charge since the first two are hogging it all.
Additionally, in Etsy’s lab, we noticed some devices would be turned on, but as soon as you disconnected them from the hub, they would shut off and not power back on until plugged in. It was puzzling until we realized that only two of the ports would charge devices, while the rest would only power a device without charging.
Similarly, if you’ve ever tried to use an iPhone charger to charge an iPad, you will have noticed that it takes a very… long… time. When choosing hubs, be sure to look at the specifications to find out how many full-load devices it will support. Otherwise, you may be stranded with some power-hungry devices!
Build to support your most power-hungry devices
Now that you’ve got the basics of electricity down, here are some additional things to ask yourself once you have devices in hand: How much power does each device in my lab draw, according to the manufacturer’s specifications? You’ll notice that tablets and newer devices will draw a lot of energy, so plan to connect them directly to power supplies so that they don’t create issues with other devices attached to the same USB hub.
How many USB outlets or power outlets will I need for the lab? Count the number of devices that you have, and what kind of power they draw. Do some math to figure out how many can connect to USB hubs, and how many will need to connect directly to a power strip.
To optimize on space, how much power can each surge protector or power strip that I have support? Or, how much power can each USB hub support? By minimizing the amount of hardware you need to support your lab, you’ll save on costs and footprint. Figure out how this setup will work with your shelving, and optimize for accessibility so that you can easily add or remove devices from the lab.
Troubleshooting power issues
You will still likely encounter power-related problems when building your device lab. Power problems exhibit a range of symptoms that at first glance might lead you to think a device itself is faulty. The trick here is to always look to troubleshoot power problems first before replacing a device. When we initially got Etsy’s device lab up and running, we found that more than half of our devices had power-related problems (it is important to note that none of the problems were due to the devices being in used condition).
So – how do we fix these kinds of power problems? The trick is to troubleshoot one part of the power chain at a time. It can be time- consuming and exhausting; you may even want to just give up and replace the device or take it out of commission. But if you isolate each part of the power chain and test it individually and patiently, you’ll be able to save yourself quite a bit of money.
You already have everyday experience with troubleshooting. For instance, what would you do if your phone suddenly stopped charging after you plugged it in? What steps would you take to resolve it? Perhaps you would try a different cable or outlet, or maybe you would power cycle your device.
Let’s start with an example from our device lab. In the Table 2–1, we outline the symptoms and steps taken when engineer checked out a Windows Surface from our lab but noticed it wasn’t charging.
| Symptom | Potential faulty part | Troubleshooting step |
|---|---|---|
| Windows Surface wasn’t charging when plugged in. | Original outlet. | Engineer tried plugging it into a different outlet across the room, to see if the original outlet itself was faulty |
| The Surface still wasn’t charging, even on a different outlet. | Device itself. | Engineer looked up the manufacturer’s guide and tried their recommended troubleshooting steps. |
| No recommended troubleshooting worked. | Cable. | Since the Surface’s charger is proprietary, we couldn’t check and see if a different cable would help. We ordered a replacement charger to troubleshoot further. When the replacement arrived, the Surface began taking a charge again, confirming that the original charger had died. |
What could have been the cost of a new Windows Surface ended up being only $40. Here’s the thing: troubleshooting can initially be time consuming but it can save a lot of time and money in the long run. Although replacing a device might seem like the easiest solution, it is usually not necessary.
When it comes to troubleshooting power problems, start with the most simple and most probable. There’s a saying that goes, “When you see hoof prints, look for horses, not zebras.” After all, if your phone didn’t turn on, you probably wouldn’t have an electrician come rewire your apartment!
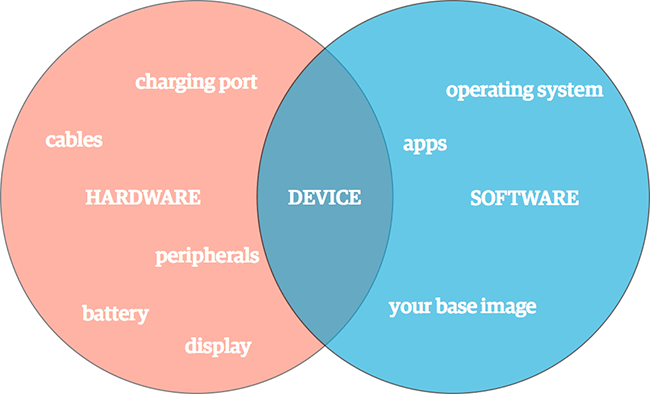
In order to isolate a cause, you essentially want to try to recreate the issue by systematically making one change at a time and then checking results. In this diagram, we divide the problem space into two parts: hardware and software. Within each problem space, there are different components we can check:
In our device lab, we were finding that some devices were drawing too much power from shared USB hubs, while others weren’t getting enough power. We fixed this issue by isolating the devices that overdrew power and plugging them directly into the power supply. When we encountered a bad USB cable or other peripheral, we replaced it and bought a few spares to quickly solve future issues. Other times, we needed to update software to help us troubleshoot.
It’s helpful to have spare cables and peripherals on hand to help you isolate hardware problems, and to have an easy way to back up to a previous image of the device (or uninstall/reinstall apps) to troubleshoot software problems. Once you have fixed any existing power issues, it’s time to consider iterating on your power supply chain.
Iterate on power solutions
If you do the energy math early, you may be able to shortcut the power solution process and come up with a great solution early. But because we were learning about best practices and usability as we built the lab, we ended up optimizing our lab by going through four iterations of power supply chains:
- Devices were plugged directly into two 10-port surge protectors, which were plugged into a timer. The timer controlled what time the lab would turn on and off daily. However, we quickly realized that space would become an issue, so we decided to introduce USB hubs into our power chain.
- We added USB hubs that connected to the surge protectors and then plugged all of our lab’s devices into the hubs. However, we learned that these particular hubs were incompatible with our timer solution; the hubs had to be manually powered on each day when the timer turned back on in the morning (rather than automatically routing power to the devices). This was inconvenient for our maintenance of the lab and required it to be babysat. We needed better, smarter USB hubs.
- We implemented better USB hubs that automatically turned on when the timed power supply turned on in the morning. These better USB hubs, described below, also helped us troubleshoot faulty devices and devices that overdraw power. We were still having problems with maintenance, however; our cabling was inconvenient to maintain and kept the lab looking cluttered. We also realized that we needed more data about how much energy the device lab was consuming.
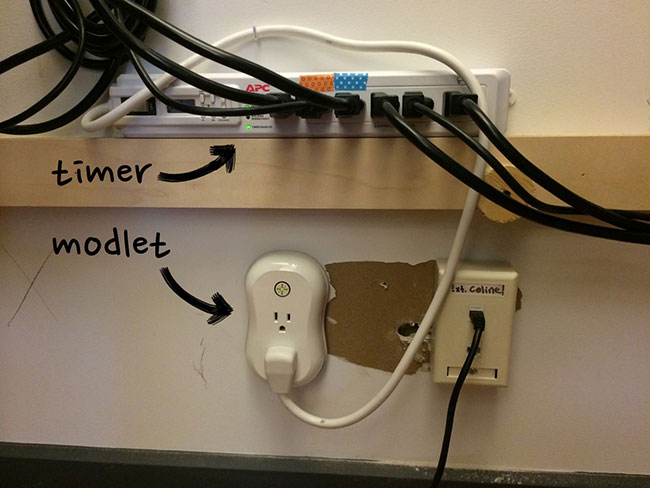
- We reorganized our cabling solutions to make it easier for us to maintain the lab and prevent cable stealing, and we added power monitoring with a Modlet.
USB hubs are ideal for lower powered devices (like most of the ones we have our Device Lab) but they are not suitable for larger, more power hungry devices like the iPad or other tablets. Tablets generally require a higher charging level, so they will charge very, very slowly, or not power on at all. Depending on the USB hub, they can also prevent other devices from effectively charging.
The USB hubs we ended up choosing in the third version of our iteration can handle up to 32 devices. Each port on each USB hub is powered to the maximum of the USB standard. The hubs include a safety protection device that prevents a higher charge from going to any one port, and a fault indicator light that helps us identify problematic devices. The hub disables devices consuming excess current, leaving non-faulty devices charging. Overall, they have been a great solution to help us manage power to devices in the lab.
In addition to the above tips about iterating on power supplies and USB hubs, we recommend that you standardize your cabling as much as possible. It makes troubleshooting easier in the long run. Not all cables were created equally; some are weaker and some are more powerful. Keep in mind that some device cables you just can’t standardize, as their charging method is proprietary (like the Windows Surface). If your budget allows for it, keep duplicates of standard cables, surge protectors, and other parts of your power supply chain in or nearby your lab. These duplicates can act as back-ups in case a piece of the chain dies, and as tools for troubleshooting.
Energy efficiency
Device labs are inherently power-hungry. Etsy is a B-Corporation, and we care about the environment and our energy consumption. B Corps, or benefit corporations, are certified to meet rigorous standards of social and environmental performance, accountability, and transparency. Naturally, we were curious about how much energy we were consuming with our lab. We take social responsibility seriously, and being green matters to us. In the fourth version of our power organization, monitoring helped us measure our energy consumption.
Etsy’s device lab devices are plugged into a timed power supply that is only on between 10am and 6pm on weekdays. This ensures devices are alive for testing, but also aren’t sucking energy 24/7. The Modlet we implemented tells us how much energy we’re consuming through that power supply.
Below is a graph of the data that the Modlet provides. This kind of graphing comes out of the box with Modlet and is super easy to set up.
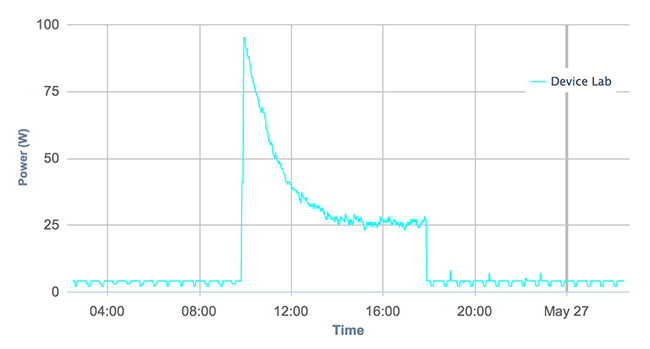
As you can see, we have a spike in energy consumption at the time that the lab turns on every weekday, and that level decreases as devices reach full charge during the day. When the device lab is off at night, there is just a trickle of energy being consumed. In the future, we can consider experimenting with what times of day the device lab is on, and what impact this has in our overall energy consumption (particularly when it turns on in the morning).
In the next chapter, we’ll focus on setting up and configuring the devices in your lab. From emails to apps, from labels to managing your suite of devices over time, it’s important to standardize the way you set up devices in your lab to save you headaches and to increase the lab’s intuitiveness.
Chapter Summary
Usability tips
- Understand the way energy works so that you can figure out what power solutions will work best for the particular devices in your lab.
- Build to support your most power-hungry devices.
- To troubleshoot power issues, isolate each component one at a time. Keep spare cables and peripherals around for troubleshooting.
- Focus on the usability of your power setup as well as its energy efficiency. Iterate on these over time.
Budget tips
- Do the math early on how much power each device needs to save you costs in iterating on your power supply chain over time.
- If possible, budget for spare cables and peripherals for troubleshooting problems in your lab.
- Measure the energy consumption of your lab to save on energy costs.